Access APIs
APIs (Application Programming Interfaces) allow your apps to interact with external services, fetch data from databases, send notifications, and much more.
Get data from an API
- Add an HTTP node
- Enter the API URL in the "URL" input
- Configure headers if needed
- Choose the request method (GET, POST, etc.)
- Add request parameters or body if required
- Update the node to fetch data
- Learn more about a node's update behaviour
For API calls with CORS restrictions, use the PnP companion app
HTTP Node responses
The HTTP node outputs the following content:
- Status: HTTP status code (e.g., 200, 404, 500)
- Response: The response body (often JSON)
- Error: Any error that occurred during the request
Processing API Responses
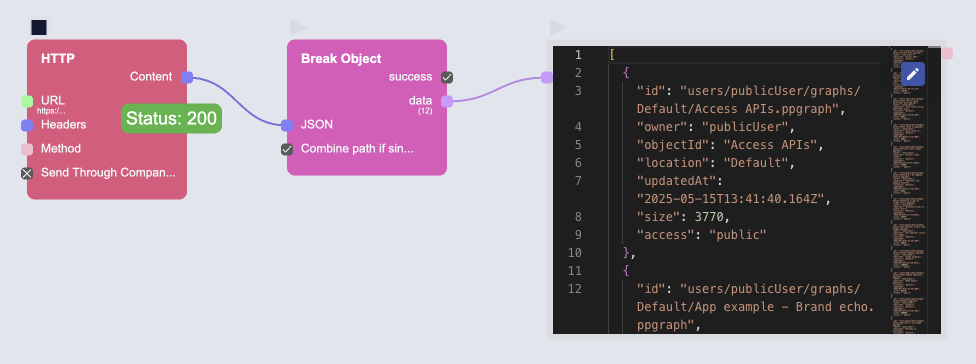
Most APIs return data in JSON format, which you'll need to parse and process:
- Connect the HTTP node's Response output to a Break node
- Then connect to its data output
Authentication Methods
Storing API Keys Securely (Recommended)
You can securely store your API keys and reference them in HTTP nodes using the $TM_KEY{key_name} syntax. This keeps your credentials safe and makes it easy to share apps without exposing sensitive values.
There are two ways to store API keys, depending on your companion location setting:
Cloud Companion (Recommended)
Use the Cloud Companion if you want to run your apps on mobile devices, as the local companion app is only available on desktop.
With Companion location set to Cloud:
- Sign in to tailrmade
- Click on your profile icon and go to User Profile
- Click the key icon to open the API Keys manager
- Add a new API key:
- Name: A reference name for your key (e.g.,
openai) - Domain: The API domain (e.g.,
api.openai.com) - API Key: Your actual API key or token value
- Name: A reference name for your key (e.g.,
Local Companion
When using the local companion app with Companion location set to Local:
- Create a
.envfile in the same folder as the companion executable - Add your API keys in the format:
openai=your_api_key_hereweather=another_api_key
Using Stored Keys
Once your keys are stored (either in the cloud or locally), reference them in your HTTP node headers:
{
  "Authorization": "Token $TM_KEY{openai}",
  "Content-Type": "application/json"
}
The $TM_KEY{key_name} placeholder will be replaced with your actual key when the request is made.
Direct Authentication
If you need to quickly test an API without setting up stored keys, you can add credentials directly to the HTTP node headers.
This approach exposes your keys in the app.
API Keys
For APIs requiring an API key:
- In the HTTP node's Headers section, add:
orAuthorization: ApiKey YOUR_API_KEYX-API-Key: YOUR_API_KEY
Bearer Tokens
For APIs using bearer token authentication:
- In the HTTP node's Headers section, add:
Authorization: Bearer YOUR_TOKEN
OAuth Authentication
For OAuth-based APIs, you'll typically:
- Add an HTTP node to handle the authentication flow
- Store the returned token using a Store node
- Use that token in subsequent API requests
Handling CORS Issues
When facing CORS (Cross-Origin Resource Sharing) issues:
Using the PnP Companion App
- Download and install the PnP Companion app
- Run the companion app on your computer
- Use the HTTP node with the companion app enabled
Best Practices
Rate Limiting
Be mindful of API rate limits:
- Add delays between requests
- Batch requests when possible
- Cache responses to reduce API calls
Security
Keep your API credentials secure:
- Use the stored API keys feature to avoid hardcoding keys in your apps
- Reference keys using
$TM_KEY{key_name}syntax in HTTP node headers - Never share apps with hardcoded API keys
- Use appropriate authentication for sensitive APIs
Data Validation
Always validate API responses:
- Check if the expected data exists
- Handle missing or null values gracefully
- Transform data into the expected format
Common Issues
- 401/403 errors: Authentication issues
- 404 errors: Incorrect endpoint URL
- CORS errors: Cross-origin resource sharing restrictions
- Rate limit exceeded: Too many requests too quickly